{Power Script}Add Dynamic options in an option set in Model driven Apps

Overview:

In this article, we are going to see how to create a custom option set field and add dynamic options to the custom option set using JavaScript.

Step 1: Create an Option set field and add one option.

clip_image002

Step 2: Declare an array and Store three values.

Step 3: Write the script below.

function setOptions(executionContext)

{

var formContext = executionContext.getFormContext();

var optionCode = formContext.getControl(arg);

optionCode.clearOptions();

countryArray = [“India”,”Singapore”,”Malaysia”];

var index = 1;

for (var i=0; i< countryArray.length; i++)

{

var Name = countryArray[i];

var obj = {};

obj[“text”] = Name;

obj[“value”] = index;

optionCode.addOption(obj);

index = index + 1;

}

}

Step 4: Deploy the Web resource and add the function on the OnLoad event of the form.

Output:

clip_image004

Hope it helps and Power 365ing as usual!

Any problem in Power Platform or Dynamics 365 – end user, Microsoft partner or an individual?

Problem Area – Technical, Functional, Training, Development or consulting?

I am here to help, get in touch here: Click here

clip_image010

{Power Tip} Use Tag charts as intuitive Month filters in Model Driven PowerApps

In one of the projects, we had a requirement to give a quick ability to users to give a monthly filter for the records created. Here is how we solved this problem using a low code way.

Let us take example of Contact entity.

Navigate to Contact entity and Click on Show Chart

clip_image002

Create New from here:

clip_image004

Chart designer will be opened for the user, please configure it as below:

clip_image006

On the Contact entity view, Select the chart Contacts by Created on and see the results:

clip_image008

This way the month filters are available to the user in an intuitive experience.

Note: In this example, I have used Personal charts – you can easily utilize System charts which can be published for entire organisation too.

Hope it helps and Power 365ing as usual!

Any problem in Power Platform or Dynamics 365 – end user, Microsoft partner or an individual?

Problem Area – Technical, Functional, Training, Development or consulting?

I am here to help, get in touch here: Click here

clip_image010

{Power Mantra} The true essence of community

These are troubled times and we are all stressed as people and professionals. I wanted to pen down a quick Mantra for sharing true essence of a community for everyone.

Actively seeing communities in tech industry for past 8 years here are few key reasons you should come to a community:

· You have an active quest to learn

· You have an active thrust to share your knowledge

· You want to have role models and grow in the industry in guidance who have been around.

· You do not want to prove people wrong, rather want to learn from new ideas and experience.

· You do not wish to make any benefits for yourself rather share and care.

· You have an open mind and not a closed one.

In the time of crisis caused by the health and economic factors surrounding us, when many professionals are stressed – communities bring out the best out of us for helping out each other.

Follow this mantra and spread the positive aura:

· Converse!

· Share!

· Care!

· Be compassionate and passionate.

· Have empathy.

clip_image002

Hope it helps and Power 365ing as usual!

Any problem in Power Platform or Dynamics 365 – end user, Microsoft partner or an individual?

Problem Area – Technical, Functional, Training, Development or consulting?

I am here to help, get in touch here: Click here

clip_image010

{No Code Way} Enable maintenance mode in PowerApps portals

PowerApp portals often have ongoing changes to enable or disable certain features or to have new additions to the customer Portal.

While we are doing such maintenance activity it is often a need to take the website in maintenance mode so that any end user doesn’t accidentally use the portal at that stage.

Below are the steps one can use to configure this:

Step 1: Click on Portal Actions in PowerApps Portal Admin center:

clip_image002

Step 2: Select Enable Maintenance mode

clip_image004

Step 3: You can either chose Default page or Custom page as an option. In our case, I am selecting default page:

clip_image006

Step 4: And the result:

clip_image008

Hope it helps and Power 365ing as usual!

Any problem in Power Platform or Dynamics 365 – end user, Microsoft partner or an individual?

Problem Area – Technical, Functional, Training, Development or consulting?

I am here to help, get in touch here: Click here

clip_image010

{No Code Way} Analysing results for a PowerApps portal poll

In my last blog I have mentioned all the steps required to put up a specific poll on a page.

Please refer to the steps here:

https://dynamicsofdynamicscrm.com/2020/06/02/no-code-way-change-poll-options-for-a-specific-powerapps-portal-page/

In this blog we will see how to analyse the poll results.

Navigate to Portal management app –> Polls, the relevant Poll record and click on Options(Here you will be able to find the count of votes):

clip_image002

Click on Submissions to get list of submissions done:

clip_image004

Hope it helps and Power 365ing as usual!

Any problem in Power Platform or Dynamics 365 – end user, Microsoft partner or an individual?

Problem Area – Technical, Functional, Training, Development or consulting?

I am here to help, get in touch here: Click here

clip_image006

{No Code Way} Change Poll options for a specific PowerApps Portal page

Polls are a great feature in PowerApps portals. However, I have seen them utilized in less scenarios.

They are a great way to increase interaction on your portals.

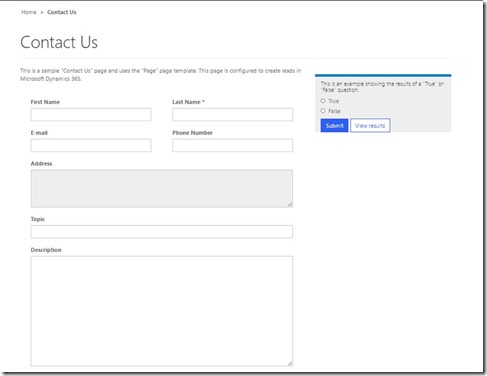
In one of my recent PowerApps portal projects there was a requirement to change the poll for a specific portal page. Here is the current look and feel of the portal page, notice the poll question available on multiple pages of the portal:

clip_image002

clip_image004

Now let us make the changes to fit our requirement.

Step 1: In order to do this, first we need to Navigate to Polls and click on New:

clip_image006

Step 2: Fill in the relevant Poll question as below and click save:

clip_image008

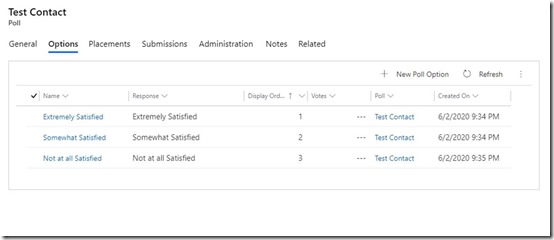
Step 3: Navigate to options and fill in relevant options one after the other:

clip_image010

Step 4: First part is now completed. Now let us see how to place this Poll specifically where we want. For this we need to create a new Poll Placement as below. Navigate to Poll placement and create new one. Here fill the right Portal name and Web Template name (this should be the one your portal page uses):

clip_image012

Step 5: Keep the Poll placement name from last step copied : ”ContactUsPoll”. Next we need to edit the web template. Liquid template knowledge helps here. However, we will just be editing a Poll name. Locate the Web Template named Contact Us and edit the tag as below:

clip_image014

Now let us see the output.

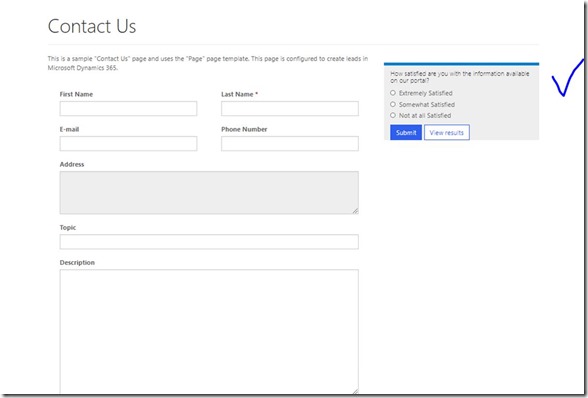
Let us first navigate to our Contact us page to see that now we have a new poll placed here:

clip_image016

Now let us go and see other portal pages:

clip_image018

Thus the poll was added to the specific page we intended.

What is the learning: Try to utilize low code way wherever possible.

Hope it helps and Power 365ing as usual!

Any problem in Power Platform or Dynamics 365 – end user, Microsoft partner or an individual?

Problem Area – Technical, Functional, Training, Development or consulting?

I am here to help, get in touch here: Click here

clip_image020

{No Code Way} Change the look and feel of Lead Source Option set in PowerApps portal Contact us page

In one of my recent PowerApps portal projects there was a requirement to change the behaviour of default Contact us page where Option Set is not visible without clicking on it. Here is the current look and feel of the portal:


clip_image002

To improve this look and feel and show this option set as a set of visible radio buttons to choose from, Here are the steps you need to follow to do it in a no code way.

Step 1: Locate the Entity Form Metadata under Entity form and click on New Entity Form Metadata:

clip_image004

Step 2: Fill the Entity Form Metadata as below:

clip_image006

clip_image008

Activate this Entity Form Metadata.

In this way, we are able to utilize the platform in a truly No code way.

Result below from PowerApps Portal page:

clip_image010

What is the learning: Try to utilize low code way wherever possible.

Hope it helps and Power 365ing as usual!

Any problem in Power Platform or Dynamics 365 – end user, Microsoft partner or an individual?

Problem Area – Technical, Functional, Training, Development or consulting?

I am here to help, get in touch here: Click here

clip_image012